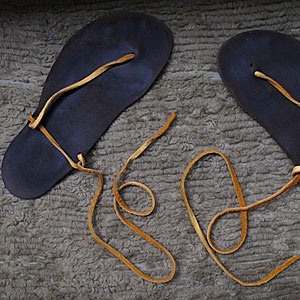
 A less-than-traditional holiday gift (photo by NIck Wenner). I smelled it first, the stench of rotting meat mixed with stale ocean air. Turning the corner into the courtyard I found my housemate Liam standing in his underwear happily draping pieces of white rubber-like strands over the fence. I posed the obvious question. “Hey Sam! I’m just drying out the sinew I collected from the whale that washed up at Half Moon Bay.”
“Oh,” I paused. “What are you going to do with it?” “I think I’m going to use it to make a hunting bow,” he said, flashing his broad, winning smile. “It’s just the perfect thing for it.” It can be easy to get sucked into American materialism, especially during this time of year. But last year, some of my housemates’ obsession with self-sufficiency and independence from our capitalist regime introduced me to the world of Do It Yourself projects. Having previously only understood DIY to mean kitschy arts and crafts kits, I first approached this DIY thing with caution, unsure that it was anything more than a hobby akin to knitting. But by demonstrating a range of projects from laundry detergent to the perfect loaf of bread, time and time again my housemates proved my skepticism unfounded. Hunting bows made from real whale sinew may be a bit out of the fledgling DIYer’s league, but this crew gave me some other ideas for unique DIY projects that could make for idiosyncratic holiday gifts. Huaraches These days, barefoot running seems to be all the rage—the once-eccentric Vibram Five Fingers are popping up on joggers’ feet left and right. Does the brand’s relatively recent success mean that this seemingly minimalist movement is really just another marketing ploy? After attempting to get to the true essence of barefoot running by going out for jogs sans any protective soles whatsoever, and coming back with impressively gruesome blood blisters on the bottom of his feet, my housemate Nick experimented with DIY huaraches, running sandals inspired by the Tarahumara tribe of Northern Mexico famous for their ability to run really long distances (like up to 120 miles in one session). They would make a great gift for any runner interested in going back to his or her evolutionary running roots. What you need: a piece of paper, a marker, a pencil, a piece of leather big enough to cover the sole of the foot, leather lace, strong scissors and a leather punch How to do it: 1) Step on the piece of paper, putting pressure on the front of the foot. 2) Cut around the tracing. 3) Place the cutout on the leather piece and trace around it with the pencil. 4) Cut out the leather sole. 5) Step on the leather sole and use the marker to make a dot between the first and second toes, slightly closer to the second toe than the first. Make a second dot by placing the pen vertically just in front of the inside anklebone. Make a third dot on the outside edge of the sole at the place where the foot makes less contact with the ground. 6) Use the leather punch to make holes through the marked dots. 7) Push the leather lace from the top to the bottom through the toe hole. Make a knot in the lace on the bottom side. 8) Pass the lace from top to bottom through the outside ankle hole, then from top to bottom through the inside ankle hole. 9) Tie them up and take them out for a spin! Pinhole Camera On one occasion I walked through the front door into a nearly completely dark room where several of my housemates were lounging on floor cushions, fixated on a spot of light on the wall coming through a carefully sized aperture in the opposite window. “Look, there’s Andi coming up the steps!” Gab, our French-Canadian couchsurfing traveler extraordinaire, was barely able to contain her excitement. She had turned the whole room into a camera obscura that projected the goings-on of our front steps onto our living room wall and had brought in everyone else to ooh and ahh at her marvelous work. While a camera obscura taking up a whole room is not exactly something you can package up and put under a tree, she later recreated this magic in a smaller, more portable form: the matchbox pinhole camera. (For photos to go along with these instructions, visit http://matchboxpinhole.com/index.html) What you need: a matchbox, a new roll of 35mm film, an empty roll of 35mm film with a 1cm stub of film sticking out (should be available from the leftovers of a film lab), a soda can, black PVC tape, a piece of curved thin plastic (such as from spiral paper binding), a pin, scissors, X-Acto knife and a black marker How to do it: 1) Mark and cut out a 24mm square in the center of the inner part of the matchbox (the matchbox tray). 2) Color in the inside of the matchbox tray and sleeve with the marker. 3) Carefully cut out a 6mm square in the center of the matchbox sleeve. 4) Cut out about a 15mm square from the can. Placing it on a piece of thick cardboard, drill a hole through it with the pin and color the back of the pinhole black. 5) Place the aluminum onto the box so that the pinhole is in the center of the square hole on top of the box. Tape the aluminum on, securing all four sides. 6) Place a piece of tape over the pinhole to act as a shutter. 7) Making the clicker: cut off a loop from the spiral binder. Place the pointed end so that it enters one of the sprocket holes of the new film canister. Tape to secure. The clicker should ride on the back of the film smoothly and make a click as it drops into the next sprocket hole. 8) Loading the camera: squarely trim off the leader and stub of film from both the new and empty film canisters. 9) Pull out a little film from the new canister and thread it through the matchbox, with the non-shiny side facing the pinhole. 10) Tape the ends of the film from the new and old canisters together with scotch tape. 11) Slide the match tray back into the box. 12) Turn the spindle of the empty film canister so that the slack film is wound into it. Push the edges of each film canister tightly into the matchbox so no film can be seen. 13) Place pieces of the PVC tape down the sides between the canisters and the box, making it light tight. Check to make sure all joints are tightly sealed. 14) The camera should be ready to go! To wind the film, turn the winder on the empty canister counterclockwise. 15) Post video of the making of this contraption on YouTube. Originally published in the Santa Cruz Weekly: http://www.santacruz.com/news/2011/11/22/gift_guide_soleful_gifts Comments are closed.
|
Samantha's
Archives
July 2016
Categories
All
|
 RSS Feed